An Overview of minting NFT


Istiak Ahmed |
The blog is to get the overview of what are NFT and how you can mint on your own. To understand the implementation and methods of creating NFT’s, we need to understand how an NFT, and token works on a blockchain, and what was the purpose for introducing an NFT in the first place in the blockchain eco-system.
An NFT is a byproduct of a smart contract that has been executed in a blockchain network. So, understanding a smart contract is important to the creation, distribution and transferring an NFT.
There are few several blockchain networks that has the capacity to write smart contracts and deploy NFT such as Binance Smart Chain, Tron, EOS and Ethereum etc. Among them Ethereum has became the most accepted and reliable network due to its continuous upgrades and developer friendly eco-system. And it is also backed-up by the Russia. So, in this documentation, we will be referencing Ethereum network only.
So let's understand first,
What are Crypto wallets?
As traditional wallets, it means storing personal belongings of a wallet user. Whether the naming derived from this, but a crypto wallet is almost the same with referring an address to the wallet. It is more likely a house rather than a wallet, where you put all your belonging and only you can access it, if you have the keys. If you lost your private keys, it is impossible in the blockchain to retrieve your items, tokens, Ether currency or NFT’s that was stored in your wallet’s reference address.
There are two keys bound to a wallet or an address node in the block network. A public key for the other wallet users to locate your wallet, a private key to access it. All the standard NFT creating smart contracts must be given a wallet address. Without a wallet you cannot mint/create an NFT. There are several ways of creating a wallet. There are also several types of wallets with same fundamentals such paper wallet, desktop or app wallet, online wallet, hardware wallet and cold storage wallets. Each of them has pros and cons on accessibility and security. To create a wallet, you need to interact to Ethereum network and access its network nodes. Online and hardware wallet services provides the infrastructure to access the Ethereum network and does all the heavy lifting to create and use your wallet. In that case they will charge you for their services.
To create your own wallet, there is an extensive amount of work and blockchain development knowledge is require. In the later section we will touch some of the technical aspects and frameworks that allows us to interact with the Ethereum network. If you want a efficient wallet service, there are several you can choose from. Coinbase and Metamask are the most popular wallet service for daily transection and use. Also, they are compatible with almost all NFT marketplace, crypto exchanges, and other online services.
Now let's Access the Ethereum Blockchain
To create an NFT, we need a smart contract that can generate NFT’s in the blockchain network. A smart contract is an executable file written in solidity language and can be deployed in the network. For creating an NFT, we need to follow some specific smart contract standards like ERC721. There is also other token standard like ERC20, this is to create fungible tokens. In this section, we will describe the steps and frameworks of creating and deploying an ERC721 smart contract on the Ethereum network.
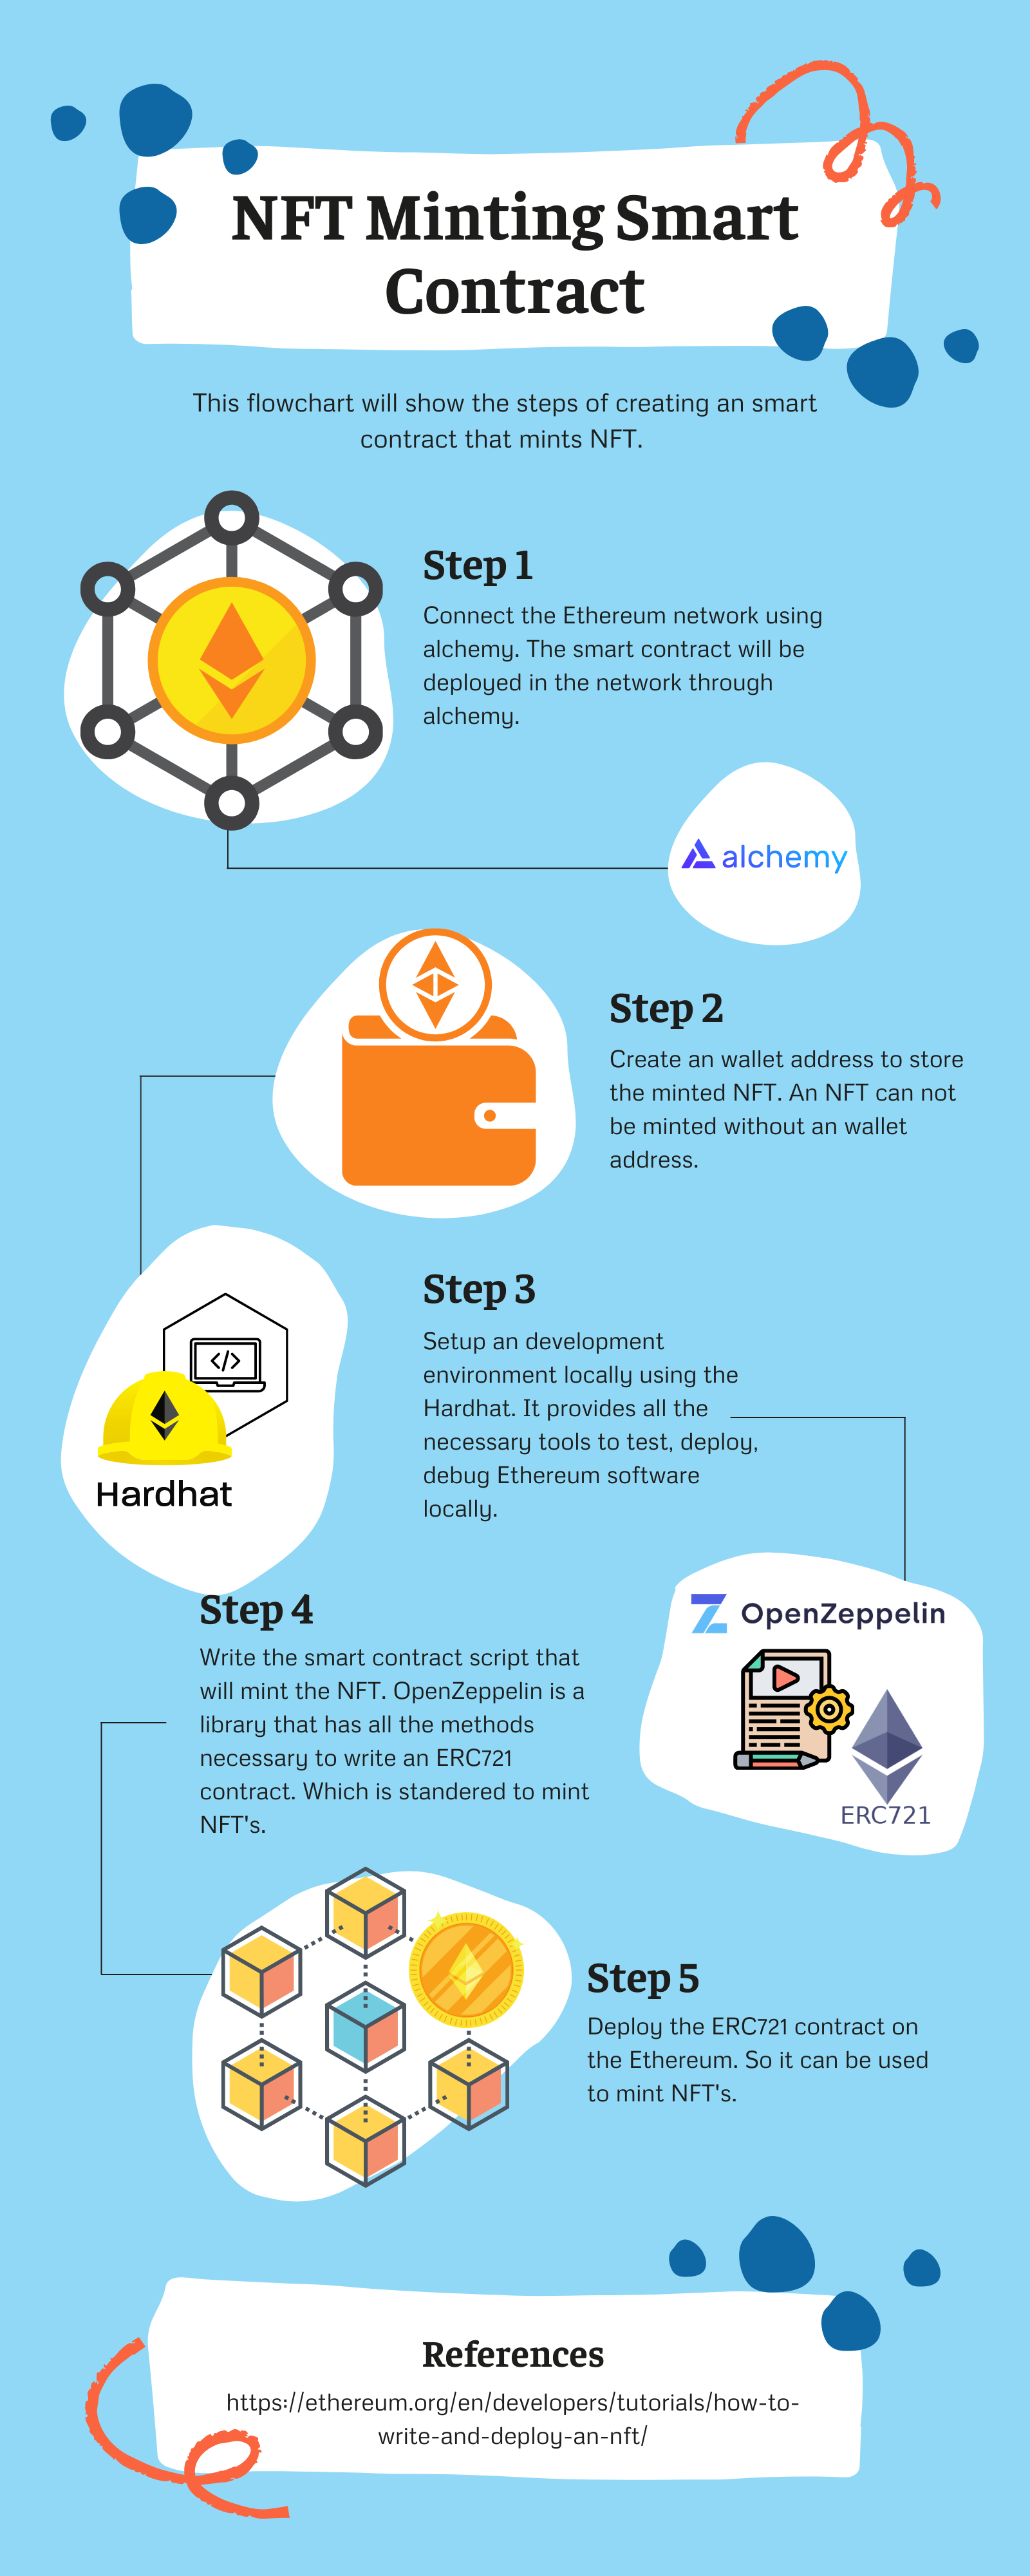
Step 1 – Connecting to Ethereum network
There are a lot of different ways to make request to the Ethereum blockchain. We can download the entire blockchain and run a node from our local device, but that will need a very high configure PC and lots of storage space. To make things easy, we will use Alchemy, a blockchain developer platform and API that will allow us to communicate with the Ethereum node. In Alchemy we need to create an app. This app will hold all our smart contract logics. Alchemy also provides, analytics and other information about the app.
Step 2 – Create an Ethereum wallet account (Address)
This address is necessary to transfer, hold and receive Eth currency and NFT. The smart contract will take wallet address as values. So, when a NFT is minted, it can send it the receiver’s address. Metamask is the easiest way to create an address. To use real Eth for creating a contract without testing is risky. So, there is a test network called Ropsten fauset. Ropsten network gives you free ETH to test your contract.
Step 3 – Setting up development environment
We need to install Hardhat, it is a development environment to compile, deploy, test and debug Ethereum software. It helps developers when building smart contracts and dApps locally before deploying to the live chain. There are few several steps to configure the development environment, that can be found on the reference given bellow. It is similar to any Node Js application.
Step 4 – Write the contract
As we have our development environment set up locally, we can start writing the logics of our contract. Smart contracts are written in a language called Solidity. There is library called OpenZeppelin, it provides you premade blueprint for dApps and smart contracts. We can find NFT smart contract code from this OpenZeppelin library’s ERC721 implementation. The library has a lot of useful methods, but the most common method is
mintNFT(address recipient, string memory uri)
The address recipient specifies the address that will receive your freshly minted NFT, and the sting memory uri will hold a JSON document that describes the NFT’s metadata. We will discuss about it in the next section.
Step 5 – Deploying the contract on the chain
We need to compile and configure all the library, api and framework. Connect Alchemy and metamask to the local project. Install a deployment library called Ether.js. it’s an easier way to interact and make requests to Ethereum by wrapping standard JSON-RPC methods with more developer friendly method. Configure hardhat config file and write the deployment script. Then we can execute the contract file with this command as,
npx hardhat run scripts/deploy.js --network ropsten
It will give us a message like,
Contract deployed to address: 0x81c587EB0fE773404c42c1d2666b5f557C470eED
To check the contract details, all its method and its validity we can go to Etherscan search with the deployed address. Etherscan is the official directory of all the address, hash, block and Token that are currently available in the Ethereum blockchain network.
Lets recape the steps,
Interacting with the chain
In this part we will be interacting with smart contract that is deployed on Ethereum network and create an NFT through the contract. We would require another library Alchemy web3, to make creating requests to Ethereum blockchain easier. Then create script file which will mint the NFT. We would require an ABI contract; it can be found on the etherscan when we search our token address.
Configure metadata for the NFT using IPFS
A metadata is the heart of your NFT. This json format metadata will contain all the description of the NFT whether it’s a video, image or GIF. A typical NFT metadata looks like this,
{
    "attributes": [
        {
        "trait_type": "Breed",
        "value": "Maltipoo"
    },
    {
        "trait_type": "Eye color",
        "value": "Mocha"
    }
    ],
    "description": "The world's most adorable and sensitive pup.",
    "image": "https://gateway.pinata.cloud/ipfs/,
    "name": "Ramses"
}
The image url is the location of your NFT file. Which can be stored into an IPFS. Pinata is decentralized file storing system like IPFS. We also need to store the JSON metadata in Pinata, and Pinata will give us an uri. Which will be the final variable of our mintNFT function.
We need to config the environment file, create an instance in our smart contract and write the transection file. Sign the transection file with your wallets private key and run Node Contract-Interact.js file. Now, running the mint-nft.js script, it will execute the script in the contract and our NFT will be minted. Every time we mint an NFT, we need to pay for Gas with Eth. The Gas amount depends on the script complexity and computation. In that case we are using Ropsten’s free Eth to pay for gas.
Done! Our NFT is minted and can be found on the wallet we created. We can transfer, deploy the NFT from our wallet to another wallet address that is available in the Ethereum network.
DONE! we just minted NFT
The above-mentioned method is the backbone of major NFT minting services, marketplace that are available on the internet. Some popular minting services are OpenSea, Raiable, Nifty Gateway, Foundation and many more. Each of them has their own terms and condition, usage and pricing. They do the heavy lifting for a user, so the user can only focus on minting their NFT’s. In return they will charge you according to their terms and conditions.